Basic snap on wire retention
Mostly this system was used on early to mid 90's Buick Regal and Skylark. On this type (fig. A) there are a series of plastic clips and a wire that runs between the clip around the back diameter of the hubcap.
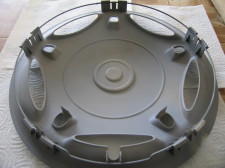
Fig. A
These wheel covers are easy to snap on. Once the wheel covers is correctly aligned with the valve stem opening, one just simply taps the hubcap into place. There is a groove in the wheel rim in which the plastic clips seat, the wire keeps a constant pressure on the clips holding the wheel cover in place.
Loss of these wheel covers occurs when the plastic tabs are broken causing the wheel cover to become loose, so care must be taken when installing. Once these tabs are broken, the hubcap will no longer remain secure and will need replacement. We recommend using a rubber mallet or the back of a fist to "tap" them into place when installing. Do not use excessive force, the hubcaps should snap into place with moderate pressure
|
Buick Hubcaps that bolt onto lugs
The second and most common hubcap retention system uses plastic caps (fig. B) that attach to the hubcap and thread on to the lug nuts. Late Model Century, LeSabre, Regal and Skylarks all use this system. The lug nuts on these vehicles (fig. C) have outside threads that accommodate the plastic caps. All of the 99 and up Buick hubcaps use this system.
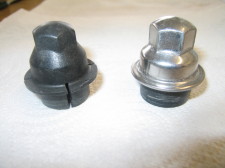 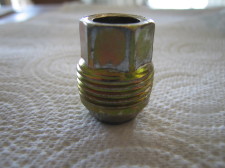
Fig. B lug caps Fig. C GM threaded lug
Installation of these wheel covers is easy. If the Buick hubcap has a center caps, remove it (fig. D). This will give you access to the lug caps (fig. E). You will then line up the wheel cover to the lug nuts being careful to ensure the valve stem is lined up with the slot that has been precut into the hubcap. If you turn the hubcap over, there is usually a notch indicating where the valve stem should go.
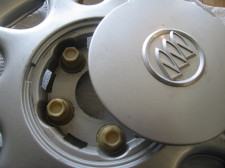 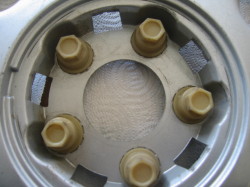
Fig. D remove center cap Fig. E exposed lug caps
Using a 3/4" socket or lugs wrench, thread the caps onto the lugs. Do not over tighten them or use any kind of air tool as this will strip out the threads, possibly causing a future loss. These lug caps only need to be snug tight.
Buick wire spoke hubcaps
Wire spoke wheel covers were the standard on most Buick models from the early 80s, until the late 90s. These hubcaps were very reliable until Buick launched the plastic locking system in 1989. With the plastic locking housing (fig F) Buick owners starting encountering losses of these "locking" wheel covers in masses. The problem occurs with these wheel covers when the locks are over tightened, the plastic housing on the back can develop a undetectable crack. In time the crack grows and results in the hubcap eventually flying off. With a replacement running over $200 at the dealer, these wire spoke hubcaps became a huge source of frustration for many. Hubcap Heaven and Wheels stocks Buick wire wheel hubcaps at a fraction of the dealers price.
 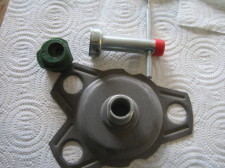
Fig. F plastic lock housing Fig. G locking components
Anatomy of a Buick wire spike hubcap
A Buick wire spoke wheel cover has four components (Fig. G). The wheel covers, locking key (wrench), locking nut and the mounting bracket. The Mounting bracket attaches to the car fitting behind three of the wheels lug nuts. This bracket is what hold the wheel cover to the car. In order to attach the wheel covers to the bracket the locking nut is screwed onto the bracket with a special patterned wrench (key).
A Buick wire spoke wheel cover has four components (Fig. H). The wheel covers, locking key (wrench), locking nut and the mounting bracket. The Mounting bracket attaches to the car fitting behind three of the wheels lug nuts. This bracket is what hold the wheel cover to the car. In order to attach the wheel covers to the bracket the locking nut is screwed onto the bracket with a special patterned wrench (key).
In order for these hubcaps to be theft proof, GM created six different patterns for these locks. The locking nut and wrench need to be the same pattern in order to work. You can tell which pattern your car has two different ways. First, the color. The cap at the end of the locking wrench and the locking nut itself must be the same color. The second (and more reliable since color fades) is a two letter code imprinted on the working end of both the locking nut and the wrench. The two letter code always begins with the letter P and ends in one of the following. B, D, G, H, S and Y. Before calling in to order one of these Buick hubcaps, please find out which locking pattern you have. You must have the correct lock in order to install the hubcap on the car. The lock is the only thing holding the hubcap on.
Installing a Buick wire spoke hubcap
Installing a Buick spoke hubcap is an easy process. First you remove the Buick logo (fig. H), this is where the locking nut resides (fig. I).
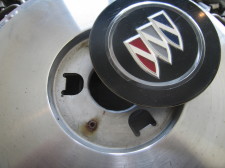 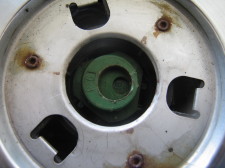
Fig. H removing logo Fig. I locking nut placement
You then place the hubcap on the wheel, lining up the valve stem with the notch provided for it. Using the locking wrench, you turn the locking nut clockwise (fig. J), securing it to the mounting bracket (fig. K). Snap the logo back into place and you are done.
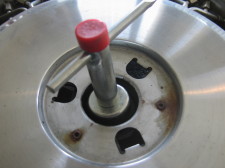 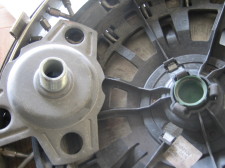
Fig. J installing the lock Fig. K bracket and lock
More about Hubcap Heaven and Wheels hubcaps
There are numerous websites on the net that state "center cap not included" or do not show an emblem on the photo of the hubcaps. All of our factory original hubcaps and wheel covers come complete with the Buick logo, center caps (if applicable) and any attachment caps that are needed. Any replica style will be clearly marked in the picture and on the order page. We don't like deception and would love for you to return to us for all your hubcap and wheel needs.
For more information such as determining your correct Buick hubcaps size and other question, please visit our FAQ and article page. For further discussion or questions, give us a call at 800-301-5814. As always, we are happy to help
|


